Taxi Empire Airport Tycoon from your first taxi to a busy airport
Idle-style management games reward patience and good spending decisions more than quick hands. Taxi Empire - Airport Tycoon follows that pattern in a tall portrait layout. Coins come in, you spend them on upgrades, and the airport grows. You manage taxis and airport services, and income keeps building whether you tap actively or let it run on its own. This guide walks through the stages in the order you meet them.
Stage one, reading the first screen
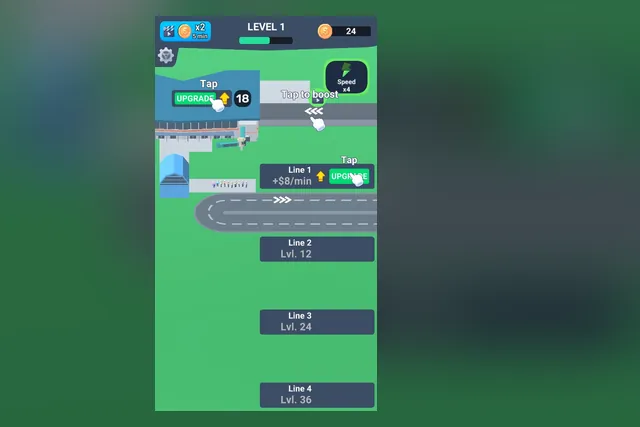
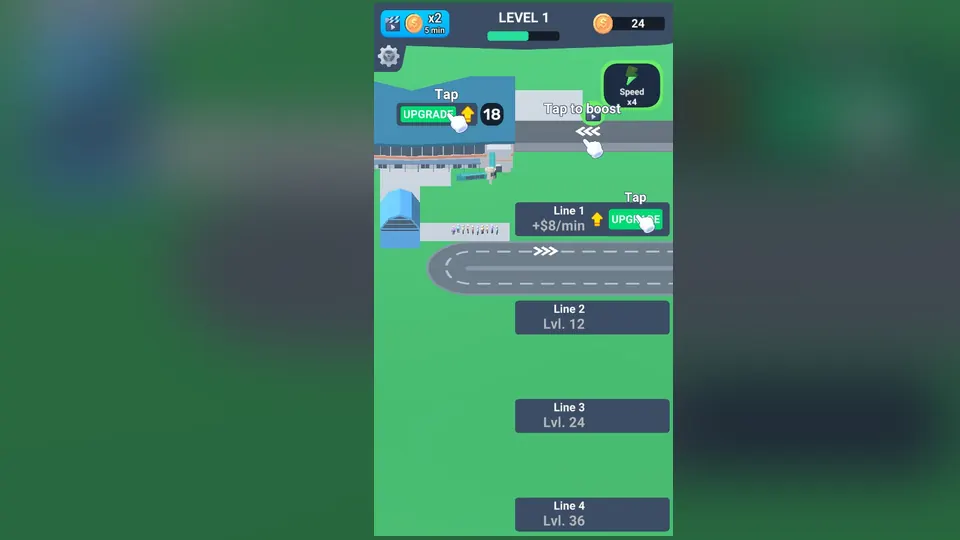
The game opens on a green airfield at Level 1 with a coin counter that reads 24. A blue terminal has an Upgrade button with a price of 18 next to it, and a pointing hand hovers over that button. A second hand sits beside the words Tap to boost. Below the runway curve is a list of rows. Line 1 shows +$8/min and has its own Upgrade button, while Lines 2, 3 and 4 are greyed out and labelled Lvl. 12, Lvl. 24 and Lvl. 36.
Before you tap anything, take a moment to read what each element is telling you. The counter is what you can spend. The price beside the button is what the next step costs. The +$8/min figure on Line 1 is what that line currently earns. Everything else on the screen is a way of changing one of those three numbers.
What to do first
- Compare your coin total with the price beside the Upgrade button.
- If you have enough, buy the upgrade the hand is pointing to.
- Look at what changed in the figures before you spend again.
Starting with 24 coins against a price of 18 means the first purchase is within reach straight away, so there is no reason to wait.
Stage two, using the boost
The prompt that reads Tap to boost and the speed boost icon are the quickest way to push the Speed multiplier. Tap the boost prompt whenever it appears. This is the active part of the game: a short burst of tapping that speeds up what the airport is already doing.
It helps to treat boosting as a supplement, not a requirement. Because income keeps building on its own, you can boost when you are watching the screen and still make progress when you are not. Use the speed boost icon when you want to speed things up, such as when you are close to affording the next upgrade and would rather not wait.
Stage three, choosing upgrades with care
As soon as you have a few purchases behind you, the game becomes a question of which button to press. Check the price next to each Upgrade button before you tap, because it changes after every purchase. A price that looked cheap a minute ago may no longer be, and a different button may now offer a better step for the same coins.
The guiding idea is to think about which upgrade to buy rather than buying whichever button is closest. A simple way to do that is to compare two things for each button: what it costs and what it adds. Line 1 is useful for this. Return to Line 1 and its +$8/min figure after each purchase to see what the upgrade added to your income. If the number moves a lot for the price, that is a good use of coins. If it barely moves, consider saving for something else.
A simple spending rule
Spend as soon as you can afford a worthwhile step, because coins sitting in the counter earn nothing. Spending early is how a small terminal turns into a larger one, since each purchase raises the income that pays for the next.
Stage four, watching the Level bar
The Level bar at the top shows how far you are from the next step. It is the best summary of your overall progress, and checking it from time to time keeps your short-term spending connected to a longer goal. When the bar is nearly full, it is worth finishing the purchases that push it forward before you switch your attention to anything else.
Stage five, planning for the greyed-out lines
Lines 2, 3 and 4 are visible from the beginning, labelled Lvl. 12, Lvl. 24 and Lvl. 36. They tell you where the airport is heading. Look ahead at them and plan your spending around those marks, instead of discovering them only when you arrive. Knowing that Level 12 is the first target gives your early upgrades a purpose, and the same applies to the later two.
Practically, this means that while you are working toward the first target you should favour steps that move the Level bar and the income on Line 1. When a new line becomes available, treat it the way you treated Line 1: read its price, read what it earns and decide whether it is the best use of your coins right now.
Stage six, the x2 badge
The x2 badge opens the double coins offer, and it carries a 5-minute timer. That timer is the main thing to plan around. Use the x2 badge when you plan to stay for a few minutes, so the whole window is spent watching and spending. Starting it and leaving immediately wastes the time it gives you.
A good habit is to line up an upgrade just before you open it. If you already know what you will buy next, you can spend the boosted coins as they arrive instead of pausing to think.
Stage seven, reinvesting profits
By now the pattern should be clear: coins in, upgrade bought, income higher, repeat. The advanced version of the same loop is simply doing it consistently. Reinvest early and often, check prices before each tap, and keep the long-term marks in view.
If you step away, the income does not stop, so you can return to a larger balance. When you do, resist the urge to spend everything on the nearest button. Take a moment to compare, buy the step that adds the most for its price, and then check the Level bar again.
The stages at a glance
| Stage | What to watch | What to do |
|---|---|---|
| First screen | Coins and price | Buy the first upgrade |
| Boosting | Tap to boost prompt | Tap when it appears |
| Upgrades | Price and +$8/min | Compare cost and gain |
| Planning | Level bar, Lvl. 12 | Aim at the next mark |
| Double coins | x2 badge timer | Use when staying a while |
Settings
The gear icon opens the settings, which is the place to look if you want to adjust how the game behaves while you play. It is worth knowing where it is before you need it.
FAQ
Do I have to keep tapping to make progress?
No. Income keeps building whether you tap actively or let it run on its own. Tapping the boost prompt speeds things up, so it is a bonus, not a requirement.
Which upgrade should I buy first?
Start with the Upgrade button that the pointing hand marks, since you begin with enough coins for it. After that, compare the price beside each button and the change in Line 1's figure, and pick the step that adds the most for what it costs.
When is the best time to use the x2 badge?
When you plan to stay for a few minutes. It carries a 5-minute timer, so it pays off most when you are watching the screen and spending the extra coins as they arrive.